
1. Prepare
- Maixduino with camera
- MaixPy
2. Transfer Mnist model to board
2.1 Download pre-trained model
wget https://github.com/bigdolphin/maixduino/raw/main/examples_micropython/models/mnist_digits.kmodel2.2 Transfer to board
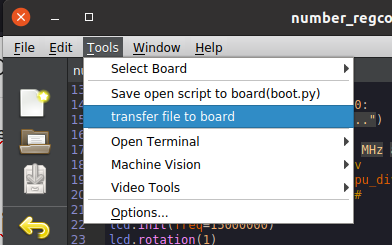
Connect board with MaixPy IDE then go to Tools -> transfer file to board to upload model to board. We can also use uPyLoader to upload and manage.
3. Writing script
3.1 Import modules
import sensor, image, time, lcd
import KPU as kpu
import gc, micropython
from Maix import freq, utils
from machine import reset
3.2 Overclock
An advantage of K210 is AI accelarator hardware called KPU,this kind of hardware gives normal microcontroller hardware (limited speed and RAM) or even CPU ability to run complex machine learning applications quickly.
Because of limited voltage and heat dissapation on Maixduino, when we need to run both CPU and KPU of K210, we should overclock CPU to 546 MHz maximum and KPU to 450 MHz maximum.
cpu_frq, kpu_frq=freq.get()
print("\nCPU Frq = %d MHz" %(cpu_frq))
print("KPU Frq = %d MHz" %(kpu_frq))
if cpu_frq != 546 or kpu_frq != 450:
    print("Removing old frequency…")
    os.remove("freq.conf")
    print("Overclocking CPU to 546 MHz and KPU to 450 MHz…")
    # kpu frequency is pll1/kpu_div
    freq.set (cpu=546, pll1=450, kpu_div=1)
3.3 Modify heap memory size
KPU core and OMV module require much heap memory to process. We should increase not only clocks but also heap size of MicroPython.
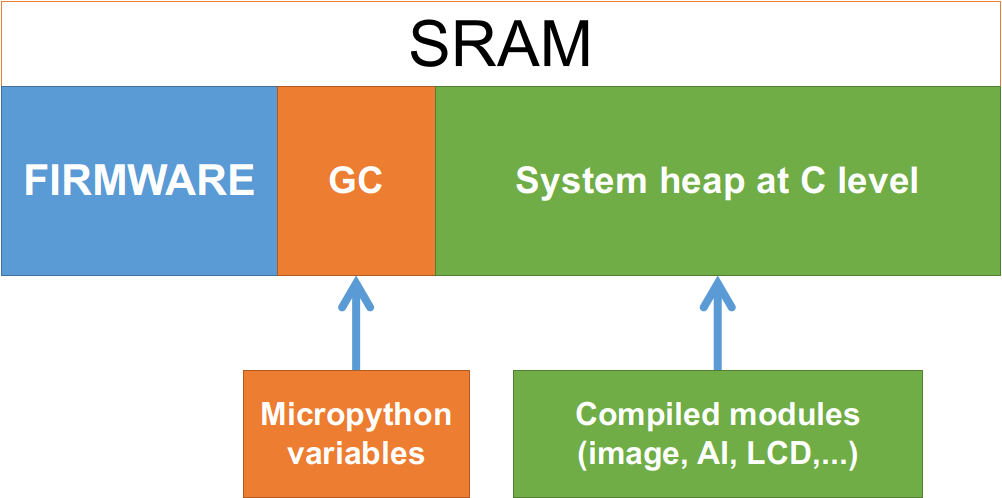
In MaixPy, two types of memory management are currently used, one is GC (garbage collection) and the other is system heap memory, both of which exist at the same time. Sipeed M1 AIOT module on Maixduino has 6 MB general purpose SRAM, the default GC uses 512KiB, and the rest is used for system heap memory management.
The total size of GC memory can be set. Therefore, the size of GC memory can be modified appropriately according to the specific usage, for example:
- In order to load a larger model, you can set the GC memory setting smaller
- If the allocation of new variables indicates insufficient memory, you can appropriately set the GC memory to be larger
- If it is not enough, consider reducing the firmware size or optimizing the code
In this tutorial, we need to load model and run many image processing functions, therefore, we need to decrease GC heap size down to 384KiB.
gc.enable()
gc.collect()
gc.threshold(gc.mem_free() // 4 + gc.mem_alloc())
micropython.mem_info()
mem_heap = utils.gc_heap_size()
heap_free = utils.heap_free()
print("Heap size: %d bytes, free: %d bytes" % (mem_heap,heap_free))
if mem_heap != 393216:
    print("Decreasing GC heap size...")
    utils.gc_heap_size(393216)
    reset()
3.4 Init LCD
lcd.init(freq=15000000)
lcd.rotation(1)
lcd.clear(0,0,0)
lcd.draw_string(20,20, "------Big Dolphin-----", lcd.WHITE, lcd.BLACK)
lcd.draw_string(20,40, "----Digit Regconizing----", lcd.WHITE, lcd.BLACK)
lcd.draw_string(20,60, "- CPU Frq: " + str(cpu_frq) + " MHz", lcd.WHITE, lcd.BLACK)
lcd.draw_string(20,80, "- KPU Frq: " + str(kpu_frq) + " MHz", lcd.WHITE, lcd.BLACK)
3.5 Load Mnist model
lcd.draw_string(20,100, "- Loading model...", lcd.WHITE, lcd.BLACK)
task_mnist = kpu.load("mnist.kmodel")
3.6 Init Camera
This pre-trained Mnist model was trained with image size of 224 x 224, therefore, camera resolution must be configured at 224 x 224.
lcd.draw_string(20,120, "- Loading Camera...", lcd.WHITE, lcd.BLACK)
sensor.reset()
sensor.set_pixformat(sensor.RGB565)
sensor.set_framesize(sensor.QVGA)
# set to 224x224 input
sensor.set_windowing((224, 224))
# No vertial flip
sensor.set_vflip(0)
# No horizontal mirror
sensor.set_hmirror(0)
sensor.run(1)
sensor.skip_frames(30)
3.7 Clear LCD
time.sleep(1)
lcd.clear()
3.8 Main loop
while True:
     # read camera
     img_mnist = sensor.snapshot()
     # Rotate image
     img_mnist.set(hmirror=True, vflip=False, transpose=True)
     # Convert to gray
     img_mnist1 = img_mnist.to_grayscale(1)
     # Resize to mnist input 28x28
     img_mnist1 = img_mnist1.resize(28,28)
     # Histogram equalization
     img_mnist1 = img_mnist1.histeq(adaptive=True)
     # Get histogram
     img_hist = img_mnist1.get_histogram()
     # Get optimal threshold
     otsu_th = img_hist.get_threshold()
     otsu_l = otsu_th.l_value()
     otsu_a = otsu_th.a_value()
     otsu_b = otsu_th.b_value()
     # Thresholding image
     img_mnist1 = img_mnist1.binary([(0, otsu_l), (-128, otsu_a),(-128, otsu_b)])
     # Preprocessing pictures, eliminate dark corner
     img_mnist1.strech_char(1)
     # Generate data for ai
     img_mnist1.pix_to_ai()
     # Run neural network model
     fmap_mnist = kpu.forward(task_mnist,img_mnist1)
     # Get result (10 digit's probability)
     plist_mnist = fmap_mnist[:]
     # Get max probability
     pmax_mnist = max(plist_mnist)
     # Get the digit
     max_index_mnist = plist_mnist.index(pmax_mnist)
     # Print results
     print("Detected number: %d " % (max_index_mnist) + ", confidence: %.1f%% " % (pmax_mnist100))     # Show large picture to LCD     lcd.display(img_mnist,oft=(0,80))     # Show small picture to LCD     lcd.display(img_mnist1,oft=(0,50))     # Draw results to LCD     if pmax_mnist > 0.55:         lcd.draw_string(8,8 ,"Detected number: %d " % (max_index_mnist),lcd.WHITE,lcd.BLACK)         lcd.draw_string(8,24,"---> Confidence: %.1f%% " % (pmax_mnist100),lcd.WHITE,lcd.BLACK)
     else:
         lcd.draw_string(8,8 ,"Detected number: NaN ",lcd.WHITE,lcd.BLACK)
         lcd.draw_string(8,24,"---> Confidence: %.1f%% " % (pmax_mnist*100),lcd.WHITE,lcd.BLACK)
     gc.collect()
3.9 Deinit KPU
kpu.deinit(task)4. Test
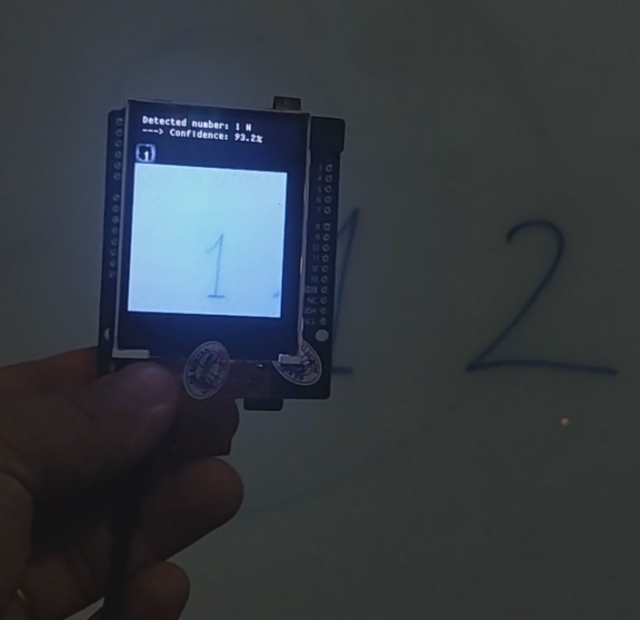
Digit should be black color on white background for this model. Save the script above to board and run test.
Full code and model can be downloaded from https://github.com/bigdolphin/maixduino
Leave a Reply