1. Prepare
- Maixduino with customized firmware
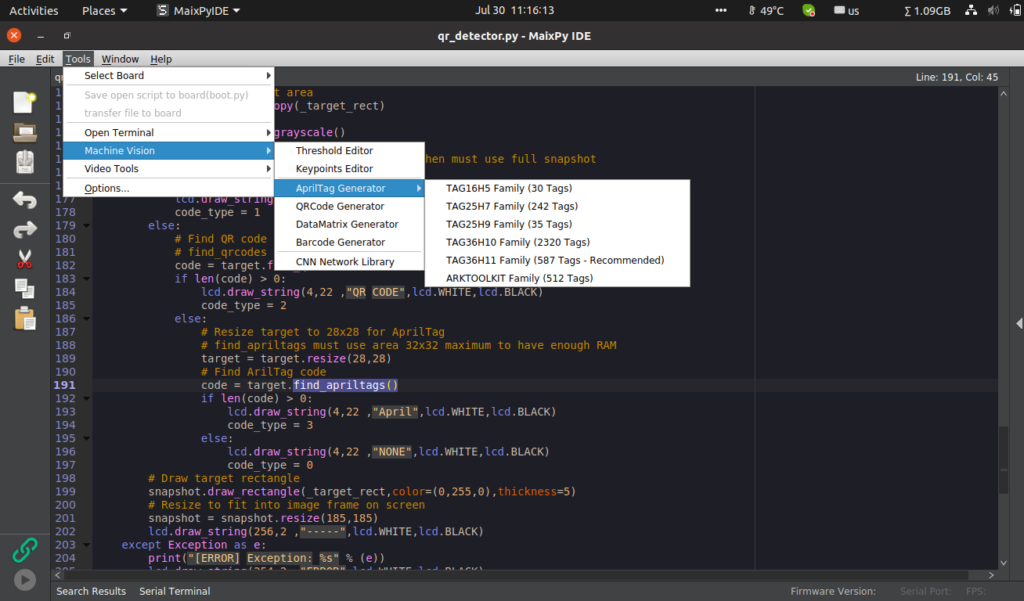
- Barcode, QR code and AprilTag code for testing
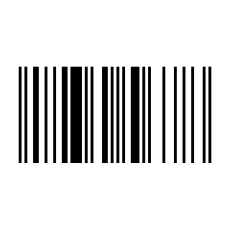


All types of codes above can be generated from built-in tool of MaixPy IDE. Go to “Tools -> Machine Vision” to select generator you need.
2. Barcode detection
Barcode detection is a built-in function inside OMV module of Micropython. This function requires medium resolution image to get best results, it should be 640 by 40/80/160 window. Calling function is find_barcodes([roi]) where roi is region-of-interest rectangle tuple (x,y,w,h). If roi is not specified, it is equal to whole image. This function does not support compressed image or bayer image. Return value is barcode class object. If there are many barcodes inside the roi, return value is array of objects. Barcode class object has functions as in table below.
| Method name | Features |
|---|---|
| barcode.corners() | Returns a list of four tuples (x, y) consisting of the four corners of the object. The four corners are usually returned in clockwise order starting from the upper left corner. |
| barcode.rect() | Return a rectangular tuple (x, y, w, h), used in other image methods such as image.draw_rectangle of the bounding box of the data matrix. |
| barcode.x() | Returns the x coordinate of the bounding box of the barcode (int) |
| barcode.y() | Returns the y coordinate (int) of the bounding box of the barcode. |
| barcode.w() | Returns the w width of the bounding box of the barcode (int) |
| barcode.h() | Returns the h height (int) of the bounding box of the barcode. |
| barcode.payload() | Returns the string of the payload of the barcode. Example: Quantity. |
| barcode.type() | Returns the enumeration type of the barcode (int) |
| barcode.rotation() | Returns the curl of the barcode in radians (floating point number) |
| barcode.quality() | Returns the number of times the barcode was detected in the image (int) |
snapshot = sensor.snapshot()
code = snapshot.find_barcodes()
for i in code:
    code_text = i.payload()
    print(code_text)
3. QR Code detection
Like Bar code, QR code detection is also a built-in function inside OMV module of Micropython. This function can work well with low resolution image. Calling function is find_qrcodes([roi]) where roi is region-of-interest rectangle tuple (x,y,w,h). If roi is not specified, it is equal to whole image. This function does not support compressed image or bayer image. Return value is QR code class object. If there are many QR codes inside the roi, return value is array of objects. QR code class object has functions as in table below.
| Method name | Features |
|---|---|
| qrcode.corners() | Returns a list of four tuples (x, y) consisting of the four corners of the object. The four corners are usually returned in clockwise order starting from the upper left corner. |
| qrcode.rect() | Returns a rectangular tuple (x, y, w, h), used in other image methods such as image.draw_rectangle of the bounding box of the QR code. |
| qrcode.x() | Returns the x coordinate of the bounding box of the QR code (int) |
| qrcode.y() | Returns the y coordinate (int) of the bounding box of the QR code. |
| qrcode.w() | Returns the w coordinate (int) of the bounding box of the QR code. |
| qrcode.h() | Returns the h coordinate (int) of the bounding box of the QR code. |
| qrcode.payload() | Returns the string of the QR code payload, such as URL. |
| qrcode.version() | Returns the version number (int) of the QR code. |
| qrcode.ecc_level() | Returns the ECC level of the QR code (int). |
| qrcode.data_type() | Returns the data type of the QR code. |
| qrcode.eci() | Returns the ECI of the QR code. ECI stores the code of the data bytes stored in the QR code. If you want to process a QR code that contains more than standard ASCII text, you need to check this value. |
| qrcode.is_numeric() | If the data type of the QR code is digital, it returns True |
| qrcode.is_alphanumeric() | If the data type of the QR code is alphanumeric, it returns True. |
| qrcode.is_binary() | If the data type of the QR code is binary, it returns True |
| qrcode.is_kanji() | If the data type of the QR code is Kanji, it returns True |
_target_rect = [(224-120)//2, (224-120)//2, 120, 120]
snapshot = sensor.snapshot()
code = snapshot.find_qrcodes(_target_rect)
for i in code:
    code_text = i.payload()
    print(code_text)
4. AprilTag
AprilTag is a visual fiducial system, useful for a wide variety of tasks including augmented reality, robotics, and camera calibration. Targets can be created from an ordinary printer, and the AprilTag detection software computes the precise 3D position, orientation, and identity of the tags relative to the camera. The AprilTag library is implemented in C with no external dependencies. It is designed to be easily included in other applications, as well as be portable to embedded devices. Real-time performance can be achieved even on cell-phone grade processors.
The most advantage of apriltag is robust to lighting conditions and view angle. Maixpy IDE has built-in tool to generate this tag.
In Micropython, apriltag detection is implemented inside OMV module. Calling function is find_apriltags([roi]) where roi is region-of-interest rectangle tuple (x,y,w,h). If roi is not specified, it is equal to whole image. A big issue of this function in Micropython is it allocs much RAM that usually causes “Out of momery” issue. Therefore, the ROI size should be 32×32 maximum, the best size is 28×28. This function does not support compressed image or bayer image. Return value is AprilTag code class object. If there are many AprilTag codes inside the roi, return value is array of objects. AprilTag code class object has functions as in table below.
| Method name | Features |
|---|---|
| apriltag.corners() | Returns a list of four tuples (x, y) consisting of the four corners of the object. |
| apriltag.rect() | Returns a rectangular tuple (x, y, w, h), used in other image methods such as image.draw_rectangle of AprilTag bounding box |
| apriltag.x() | Returns the x coordinate (int) of the AprilTag bounding box. |
| apriltag.y() | Returns the y coordinate (int) of the bounding box of AprilTag. |
| apriltag.w() | Returns the w coordinate (int) of the bounding box of AprilTag. |
| apriltag.h() | Returns the h coordinate (int) of the bounding box of AprilTag. |
| apriltag.id() | Returns the numeric ID of AprilTag. |
| apriltag.family() | Return to AprilTag’s digital home. |
| apriltag.cx() | Returns the center x position (int) of AprilTag. |
| apriltag.cy() | Returns the center y position (int) of AprilTag. |
| apriltag.rotation() | Returns the curl of AprilTag in radians (int). |
| apriltag.decision_margin() | Returns the color saturation of AprilTag matching (value 0.0-1.0), where 1.0 is the best. |
| apriltag.hamming() | Returns the acceptable digital error value of AprilTag. |
| apriltag.goodness() | Returns the color saturation of the AprilTag image (value 0.0-1.0), where 1.0 is the best. |
| apriltag.x_translation() | Returns the transformation in the x direction from the camera. The unit of the distance is unknown. |
| apriltag.y_translation() | Returns the transformation in the y direction from the camera. The unit of the distance is unknown. |
| apriltag.z_translation() | Returns the transformation in the z direction from the camera. The unit of the distance is unknown. |
| apriltag.x_rotation() | Returns the rotation of AprilTag on the X plane in radians. Example: Looking at AprilTag, move the camera from left to right. |
| apriltag.y_rotation() | Returns the rotation of AprilTag in radians on the Y plane. Example: Looking at AprilTag, move the camera from top to bottom. |
| apriltag.z_rotation() | Returns the rotation of AprilTag in radians on the Z plane. Example: Look at AprilTag and rotate the camera. |
_target_rect = [(224-28)//2, (224-28)//2, 28, 28]
snapshot = sensor.snapshot()
code = snapshot.find_apriltags(_target_rect)
for i in code:
code_text = str(i.id())
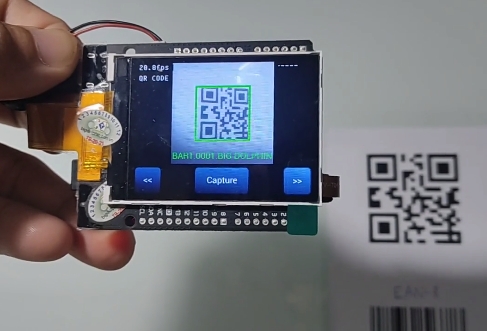
print(code_text)5. Full script and test
The script below will detect all types of codes (Bar code, QR code and AprilTag) with a LvGl GUI on LCD screen.
# Notice: LvGl must be enabled in firmware
import sensor, image, time, lcd, gc, micropython
import lvgl as lv
import lvgl_helper as lv_h

from fpioa_manager import fm
from board import board_info
from machine import Timer

###################################
print('\n-----------------------------')
# Check frequencies and overclock
import gc, micropython
from Maix import freq, GPIO, utils
from machine import reset

cpu_frq, kpu_frq=freq.get()
print("\nCPU Frq = %d MHz" % (cpu_frq))
print("KPU Frq = %d MHz" % (kpu_frq))

if cpu_frq != 546 or kpu_frq != 450:
    print("Removing old frequency...")
    os.remove("freq.conf")
    print("Overclocking CPU to 546 MHz and KPU to 450 MHz...")
    # kpu frequency is pll1/kpu_div
    freq.set (cpu=546, pll1=450, kpu_div=1)

gc.enable()
gc.collect()
gc.threshold(gc.mem_free() // 4 + gc.mem_alloc())
micropython.mem_info()
mem_heap = utils.gc_heap_size()
heap_free = utils.heap_free()
print("Heap size: %d bytes, free: %d bytes" % (mem_heap,heap_free))
if mem_heap != 393216:
    print("Decreasing GC heap size...")
    utils.gc_heap_size(393216)
    reset()
print('-----------------------------')
 ###################################

# Register GPIO
fm.register(board_info.LED_R, fm.fpioa.GPIO0)
fm.register(board_info.LED_G, fm.fpioa.GPIO1)
fm.register(board_info.LED_B, fm.fpioa.GPIO2)
led_r=GPIO(GPIO.GPIO0, GPIO.OUT)
led_g=GPIO(GPIO.GPIO1, GPIO.OUT)
led_b=GPIO(GPIO.GPIO2, GPIO.OUT)

# Function to control RGB led
def led_rgb(r,g,b):
    led_r.value(r)
    led_g.value(g)
    led_b.value(b)

# Function to init camera sensor
# Maixduino can also work with OV5640
def init_sensor():
    sensor.reset()
    sensor.set_pixformat(sensor.RGB565)
    sensor.set_framesize(sensor.QVGA)
    # set to 224x224 input
    sensor.set_windowing((224, 224))
    sensor.set_vflip(0)
    sensor.set_hmirror(0)
    sensor.run(1)
    sensor.skip_frames(30)

# Camera frame speed
camera_fps = 30
# LvGl render interval
timer_period = 1000//camera_fps
# Timer counting flag for other functions
timer_flag = 0
def on_timer(timer):
    global timer_flag
    global timer_period
    timer_flag = timer_flag + 1
    # Notice to LvGL that timer_period passed
    lv.tick_inc(timer_period)

led_rgb(0,1,1)
clock = time.clock()

# Init LCD
lcd.init(freq=15000000)
lcd.rotation(0)
lcd.clear()
# Init LvGl
lv.init()
disp_buf1 = lv.disp_buf_t()
buf1_1 = bytearray(320*10)
lv.disp_buf_init(disp_buf1,buf1_1, None, len(buf1_1)//4)
disp_drv = lv.disp_drv_t()
lv.disp_drv_init(disp_drv)
disp_drv.buffer = disp_buf1
disp_drv.flush_cb = lv_h.flush
disp_drv.hor_res = 320
disp_drv.ver_res = 240
lv.disp_drv_register(disp_drv)
scr = lv.obj()
# Set background color
scr_style = lv.style_t(lv.style_plain)
scr_style.body.main_color = lv.color_hex(0)
scr_style.body.grad_color = lv.color_hex(0)
scr.set_style(scr_style)

init_sensor()
led_rgb(1,0,1)

# Add elements to screen
# Capture button
btn_capture = lv.btn(scr)
btn_capture.set_size(100,50)
btn_capture.align(lv.scr_act(), lv.ALIGN.IN_BOTTOM_MID, 0, 0)
label_capture = lv.label(btn_capture)
label_capture.set_text("Capture")
label_capture.set_size(20,20)
# Left button
btn_left = lv.btn(scr)
btn_left.set_size(50,50)
btn_left.align(lv.scr_act(), lv.ALIGN.IN_BOTTOM_LEFT, 0, 0)
label_left = lv.label(btn_left)
label_left.set_text("<<")
label_left.set_size(50,50)
# Right button
btn_right = lv.btn(scr)
btn_right.set_size(50,50)
btn_right.align(lv.scr_act(), lv.ALIGN.IN_BOTTOM_RIGHT, 0, 0)
label_right = lv.label(btn_right)
label_right.set_text(">>")
label_right.set_size(50,50)
# Image frame
video = lv.img(scr)
video.align(scr, lv.ALIGN.IN_TOP_LEFT, (320 - (240-55))//2, 0)
# Label
lb_info = lv.label(scr)
lb_info.set_long_mode(lv.label.LONG.SROLL)
lb_info.set_width(200)
lb_info.align(None, lv.ALIGN.IN_BOTTOM_MID, 0, -60)
lb_info.set_align(lv.label.ALIGN.CENTER)
# Enable re-coloring by commands in the text
lb_info.set_recolor(True)
lb_style = lv.style_t(lv.style_plain)
lb_style.text.color = lv.color_hex(0xffffff)
lb_info.set_style(lv.label.STYLE.MAIN,lb_style)
lb_info.set_text("Waiting for code...")
# Reload screen
lv.scr_load(scr)
# Activate timer
timer = Timer(Timer.TIMER0, Timer.CHANNEL0, mode=Timer.MODE_PERIODIC, period=timer_period, unit=Timer.UNIT_MS, callback=on_timer, arg=None)
###################################
# Main task
led_state = 0
# Target rect 120x120 center of QVGA.
_target_rect = [(224-120)//2, (224-120)//2, 120, 120]
code = []
code_type = 0
while True:
    clock.tick()
    # Capture camera
    snapshot = sensor.snapshot()
    # Get real FPS
    fps =clock.fps()
    lcd.draw_string(4,2 ,("%2.1ffps\r" %(fps)),lcd.WHITE,lcd.BLACK)
    try:
        # Rotate image if needed
        # snapshot.set(hmirror=True, vflip=False, transpose=True)
        # Get data of target area
        target = snapshot.copy(_target_rect)
        # Convert to gray
        target = target.to_grayscale()
        # Find BAR code
        # find_barcodes requires high resolution then must use full snapshot
        code = snapshot.find_barcodes()
        if len(code) > 0:
            lcd.draw_string(4,22 ,"BARCODE\r",lcd.WHITE,lcd.BLACK)
            code_type = 1
        else:
            # Find QR code
            # find_qrcodes can use small target area to save RAM
            code = target.find_qrcodes()
            if len(code) > 0:
                lcd.draw_string(4,22 ,"QR CODE\r",lcd.WHITE,lcd.BLACK)
                code_type = 2
            else:
                # Resize target to 28x28 for AprilTag
                # find_apriltags must use area 32x32 maximum to have enough RAM
                target = target.resize(28,28)
                # Find ArilTag code
                code = target.find_apriltags()
                if len(code) > 0:
                    lcd.draw_string(4,22 ,"April  \r",lcd.WHITE,lcd.BLACK)
                    code_type = 3
                else:
                    lcd.draw_string(4,22 ,"NONE   \r",lcd.WHITE,lcd.BLACK)
                    code_type = 0
        # Draw target rectangle
        snapshot.draw_rectangle(_target_rect,color=(0,255,0),thickness=5)
        # Resize to fit into image frame on screen
        snapshot = snapshot.resize(185,185)
        lcd.draw_string(256,2 ,"-----\r",lcd.WHITE,lcd.BLACK)
    except Exception as e:
        print("[ERROR] Exception: %s" % (e))
        lcd.draw_string(254,2 ,"ERROR\r",lcd.WHITE,lcd.BLACK)
        gc.collect()
    for i in code:
        code_text = ""
        if code_type < 3:
            code_text = i.payload()
        else:
            code_text = str(i.id())
        lb_style.text.color = lv.color_hex(0x00ff00)
        lb_info.set_style(lv.label.STYLE.MAIN,lb_style)
        lb_info.set_text(code_text)
    # Set frame data to image element
    video_data = snapshot.to_bytes()
    video_dsc = lv.img_dsc_t({
        'header':{
            'always_zero': 0,
            'w':snapshot.width(),
            'h':snapshot.height(),
            'cf':lv.img.CF.TRUE_COLOR
        },
        'data_size': len(video_data),
        'data': video_data
    })
    video.set_src(video_dsc)
    lv.task_handler()
    # Check timer event
    if timer_flag > (500//timer_period):
        timer_flag = 0
        led_state = ~led_state
        led_rgb(1,1,led_state)
Full script can be downloaded from https://github.com/bigdolphin/maixduino
Leave a Reply